My Sites


Sunday, June 11, 2017

Text Pre-processing with Python Natural Language Toolkit (NLTK)

Text Preprocessing steps
  1. Tokenization
  2. Stemming and Lemmatization
  3. Stop Word Removal
  4. POS-tagging or Part-of-Speech tagging (https://nlp.stanford.edu/software/tagger.shtml)
Play Session
python
>>> import nltk
>>> nltk.download('all')

Reference: http://www.nltk.org/

#!/usr/bin/python
# -*- coding: utf-8 -*-
import nltk
from nltk.corpus import stopwords
from nltk.tokenize import RegexpTokenizer
import json


How to simply host a Python RESTful web service on Amazon EC2 instance? (Ubuntu)

Login to your AWS Console.


Create and Launch a EC2 instance.

Select the EC2 instance type.

Create an SSH key pair to SSH login to the given instance.

Login to the EC2 instance and Install Python in AWS EC2 instance.

python --version
sudo apt-get install python3
python -m pip install pymongo

Python Flask is a microframework used to create simple RESTful web services.
python -m pip install Flask
Reference: http://flask.pocoo.org/

Consider the app_controller.py as the main python file. (Initiator)

app_controller.py

#!flask/bin/python
# -*- coding: utf-8 -*-
from __future__ import division
from pymongo import MongoClient
from flask import Flask, jsonify
from flask import request
from my_first_class import MyFirstClass
from flask_api import FlaskAPI, status, exceptions
import threading
import json

app = Flask(__name__)

# Basic GET route
@app.route('/status')
def check_status():
    return "OK"

# Basic POST route
@app.route('/profile', methods=['POST'])
def create_user():
    print request.form.get('fname')
    print request.form.get('lname')
    # do processing. return data
    return json.dumps(data), status.HTTP_200_OK

if __name__ == '__main__':
    app.run(host='0.0.0.0', threaded=True, use_reloader=True)
    # [dev localhost] app.run(threaded=True, use_reloader=True)

my_first_class.py

#!flask/bin/python
# -*- coding: utf-8 -*-
import json
from pymongo import MongoClient

class MyFirstClass:

    def __init__(self):
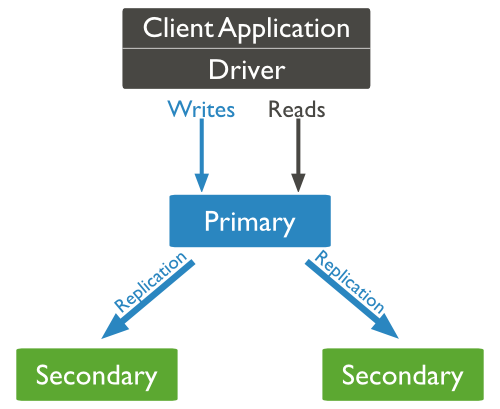
        self.client = MongoClient('mongodb://localhost:27017/')
        self.icps_db = self.client['database']

    def create_user(self):

        documents = self.database[data_collection].find({}, no_cursor_timeout=True)

        if documents is not None:

            for idx, document in enumerate(documents):

                raw_title = document['title'].encode('utf8')
                
                if "USER1" in str(raw_title).lower() or "USER2" in str(raw_title).lower():
                    name = "MANUAL_USER"

                data_record = {
                    "title": raw_title,
                    "name": name                  
                    #"words": list(word_list)
                }
                record_id = self.database[data_collection].insert(data_record)
                print("Record created. ", record_id, "  ", idx)
                self.client.close()

Run the python web service as a nohup service
nohup python app_controller.py & 

Stop the service
ps -ef | grep app_controller.py
kill -9 <pid>

Simple Must know SQL and NOSQL hacks

PostgreSQL Hacks
Install

sudo apt-get update
sudo apt-get install postgresql postgresql-contrib
sudo -i -u postgres
psql
Exit out of the PostgreSQL prompt by typing: \q
createdb test1
 \connect test1
CREATE TABLE table_name (
    column_name1 col_type (field_length) column_constraints,
    column_name2 col_type (field_length),
    column_name3 col_type (field_length)
);

MySQL Hacks
mysql -u root -p myDatabase
show databases;
use myDatabase;
show tables;
select * from table;

Take MySQL dump
mysqldump -u [uname] -p db_name > db_backup.sql

restore data dump
mysql -u root -p devengoDev < db_backup.sql

Reset MySQL Password
https://help.ubuntu.com/community/MysqlPasswordReset

sudo /etc/init.d/mysql stop
sudo /usr/sbin/mysqld --skip-grant-tables --skip-networking &
mysql -u root
FLUSH PRIVILEGES;
SET PASSWORD FOR root@'localhost' = PASSWORD('password');
UPDATE mysql.user SET Password=PASSWORD('newpwd') WHERE User='root';
FLUSH PRIVILEGES;
sudo /etc/init.d/mysql stop
sudo /etc/init.d/mysql start

MongoDB Hacks
Setup
https://docs.mongodb.com/v3.0/tutorial/install-mongodb-on-ubuntu/

sudo apt-key adv --keyserver hkp://keyserver.ubuntu.com:80 --recv EA312927
echo "deb http://repo.mongodb.org/apt/ubuntu trusty/mongodb-org/3.2 multiverse" | sudo tee /etc/apt/sources.list.d/mongodb-org-3.2.list
sudo apt-get update
sudo apt-get install -y mongodb-org
sudo service mongod start
sudo service mongod stop

mongodump -d myDatabase -o ~/backups/first_backup
mongorestore -d myDatabase ~/backups/first_backup

use mydb
show dbs
db.dropDatabase()
db.createCollection("mycollection")
show collections
db.createCollection("mycol", { capped : true, autoIndexId : true, size : 
   6142800, max : 10000 } )
db.mycol.insert({
   title: 'MongoDB Overview', 
   description: 'MongoDB is no sql database',
   by: 'tutorials point',
   url: 'http://www.tutorialspoint.com',
   tags: ['mongodb', 'database', 'NoSQL'],
   likes: 100
})
db.movie.insert({"name":"tutorials point"})
db.COLLECTION_NAME.drop()
db.mycol.find().pretty()
db.mycol.find(
   {
      $and: [
         {key1: value1}, {key2:value2}
      ]
   }
).pretty()
db.mycol.find(
   {
      $or: [
         {key1: value1}, {key2:value2}
      ]
   }
).pretty()
db.mycol.find({"likes": {$gt:10}, $or: [{"by": "tutorials point"},
   {"title": "MongoDB Overview"}]}).pretty()
{
   "_id": ObjectId(7df78ad8902c),
   "title": "MongoDB Overview", 
   "description": "MongoDB is no sql database",
   "by": "tutorials point",
   "url": "http://www.tutorialspoint.com",
   "tags": ["mongodb", "database", "NoSQL"],
   "likes": "100"
}
db.mycol.update({'title':'MongoDB Overview'},{$set:{'title':'New MongoDB Tutorial'}})
db.mycol.update({'title':'MongoDB Overview'},{$set:{'title':'New MongoDB Tutorial'}},{multi:true})
db.mycol.remove({'title':'MongoDB Overview'})
db.mycol.find({},{"title":1,_id:0}).limit(2)
db.mycol.find({},{"title":1,_id:0}).sort({"title":-1})
db.mycol.ensureIndex({"title":1})

db.mycol.aggregate([{$group : {_id : "$by_user", num_tutorial : {$sum : 1}}}])
{
   "result" : [
      {
         "_id" : "tutorials point",
         "num_tutorial" : 2
      },
      {
         "_id" : "Neo4j",
         "num_tutorial" : 1
      }
   ],
   "ok" : 1
}

Mongo Clustering

Mongo Sharding

Saturday, February 11, 2017

How does Sri Lanka get Internet ?

Hi folks,
By doing so research I found some nice articles and data sources regarding how Sri Lanka gets Internet through submarine communication cables (obviously :D).

What is a submarine communication cable ?
A submarine communications cable is a cable laid on the sea bed between land-based stations to carry telecommunication signals across stretches of ocean. The first submarine communications cables, laid in the 1850s, carried telegraphy traffic.


Source : https://en.wikipedia.org/wiki/Submarine_communications_cable

The complete submarine cable map can be found in http://www.submarinecablemap.com/

Now in Sri Lanka there are several major Internet providers such as SLT, Dialog, Airtel and etc...
Primarily there are 2 major submarine cables which provides Internet to Sri Lanka.
  1. Bay of Bengal Gateway (BBG) -  Dialog
  2. SEA-ME-WE 3 - SLT
And the landing point of most of the cables is Mount Lavinia. Following map illustrates the landing point of submarine cables in Sri Lanka.http://www.submarinecablemap.com/#/landing-point/mt-lavinia-sri-lanka
 
Bay of Bengal Gateway (BBG) 

The Bay of Bengal Gateway (BBG) is a submarine communications cable being built to provide a direct trunk connection between Barka (Sultanate of Oman) and Penang (Malaysia) with four branches to Fujairah (UAE), Mumbai (India), Colombo (Sri Lanka) and Chennai (India). The project is being carried out by a consortium that includes Vodafone, Omantel, Etisalat, Reliance Jio Infocomm, Dialog and Telekom Malaysia.

Note : This cable consists a speed of 6.4 Terrabits Per Second (Tbps) of international bandwidth to Sri Lanka. Furthermore, now adays this is identified as a 100Gbps-plus submarine cable.

In news (Tuesday 30th May 2016) : 
Sri Lanka’s premier telecommunications service provider, Dialog Axiata PLC, announced this week, the connection of Sri Lanka to the Ultra High Capacity 100G-PLUS Bay of Bengal Gateway (BBG) Submarine Fibre Optic Cable via its state-of-the-art Cable Landing Station (CLS) at Mount Lavinia (South Colombo).


Source : https://en.wikipedia.org/wiki/Bay_of_Bengal_Gateway 
https://www.dialog.lk/dialog-connects-sri-lanka-to-ultra-high-speed-100g-plus-submarine-cable
https://www.bayofbengalgateway.com/

More about Dialog Axiata Network (MTN Networks) : https://en.wikipedia.org/wiki/Dialog_Axiata 

As some of you may heard already, in early 20's there was a problem with receiving Internet to the country from the global Internet, due to a damage in digital fiber optic submarine cable. I found the following article related to that incident which explains a lot about the problem which occurred in  Aug, 2004.

http://www.networkworld.com/article/2324749/system-management/sri-lankan-internet-services-restored-after-cable-cut.html


SEA-ME-WE 3

SEA-ME-WE 3 or South-East Asia - Middle East - Western Europe 3 is an optical submarine telecommunications cable linking those regions and is the longest in the world, completed in late 2000. It is led by France Telecom and China Telecom, and is administered by Singtel, a telecommunications operator owned by the Government of Singapore. The Consortium is formed by 92 other investors from the telecom industry. It was commissioned in March 2000.

Note : SLT gets internet through this cable.

Source : http://www.seamewe5.com/
https://en.wikipedia.org/wiki/SEA-ME-WE_3
http://www.smw3.com/
https://en.wikipedia.org/wiki/Submarine_communications_cable

i2i cable network

Bharti Airtel has two international landing stations in Chennai, one connects with the i2i cable network between Chennai and Singapore, the other connects with the SEA-ME-WE 4.

Singapore Telecommunications Limited, commonly abbreviated as Singtel, is a Singaporean telecommunications company, with a combined mobile subscriber base of over 600 million customers in 25 countries at end of July, 2016,[1] making it one of the largest mobile network operators in Singapore and the 20–30 largest in the world.

Singtel has expanded aggressively outside its home market and owns shares in many regional operators, including 100% of the second largest Australian telco, Optus, which was acquired in 2001 from Cable & Wireless and other shareholders of Optus, and 32.15% [5] of Bharti Airtel, the largest carrier in India.

Source : https://en.wikipedia.org/wiki/Singtel
http://www.submarinenetworks.com/stations/asia/india/chennai-bharti

Hope you learned something new !! Cheers !!

Ubuntu Quick Hacks - Unity Panel

In case you lost the date time in the Ubuntu unity panel (top bar), please use the following commands and the problem will be solved!! Cheers

sudo apt-get install indicator-datetime
sudo dpkg-reconfigure --frontend noninteractive tzdata
sudo killall unity-panel-service

Tuesday, November 29, 2016

SSH key-based authentication related errors and fixes

Could not open a connection to your authentication agent.
eval `ssh-agent -s`
ssh-add


Add private key permanently with ssh-add on Ubuntu.
ssh-add keyname (This is the temporaray fix)
Permanant Fix


Add keys in ~/.ssh/config file:
  IdentityFile ~/.ssh/gitHubKey
  IdentityFile ~/.ssh/id_rsa_buhlServer 


Permissions 0777 for '/Users/username/.ssh/id_rsa' are too open. It is recommended that your private key files are NOT accessible by others. This private key will be ignored.

chmod 400 ~/.ssh/id_rsa
chmod 600 ~/.ssh/id_rsa


How To Configure SSH Key-Based Authentication on a Linux Server
https://www.digitalocean.com/community/tutorials/how-to-configure-ssh-key-based-authentication-on-a-linux-server

Generate a SSH key pair by typing: ssh-keygen
Copy the contents of your ~/.ssh/id_rsa.pub key into a file in the remote account's home ~/.ssh directory called
authorized_keys.

Default ssh key is id_rsa


RSA authentication with openssh
http://cects.com/openssh-rsa-authentication-for-windows-and-linux/